Wayfinding Signs and Landmark Clues for Finding a Room
Wayfinding signs and landmark clues help visitors find public rooms. Learn how to pair clear directions with recognizable features along a route.
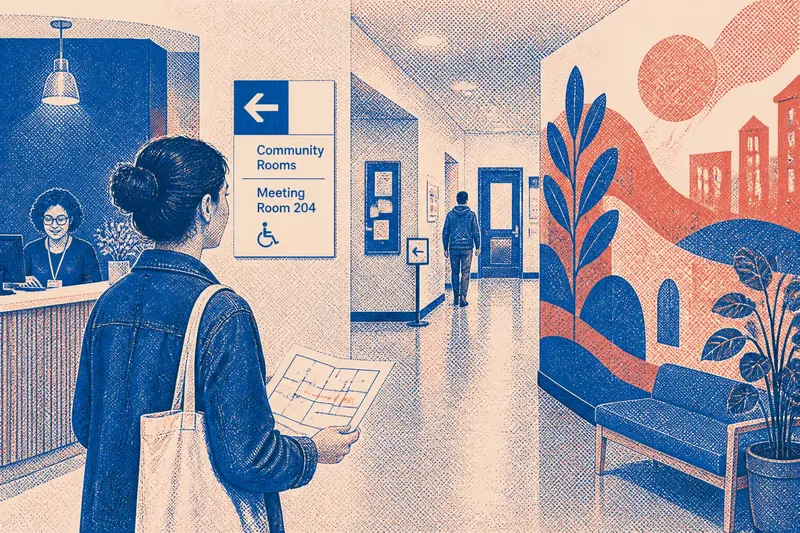
You enter a community center looking for a meeting room, but the corridor forks before you see a number. A blue arrow points left; a bright mural fills the wall on the right. Wayfinding signs and landmark clues serve different purposes: the arrow directs you, while the mural helps you recognize where you are.
For a small public building, review the same route across an ordinary week. Check how it looks during different activities and at different moments, then adjust any sign-and-landmark pairing that leaves visitors guessing.
Signs and landmarks
Signs name destinations or actions with words, symbols, or both. “Room 204” identifies a place; an arrow shows which way to turn. Use signs for precise information such as room names, floor numbers, service desks, and accessible routes.
A landmark is a distinctive feature people can spot and remember: a tiled wall, fixed artwork, a courtyard-facing window, or a brightly colored reception desk. It may help visitors confirm their location or recall an instruction such as “turn right after the mural.” On its own, however, a landmark may not tell them which room to choose.
At a junction, pair a clear instruction with a recognizable reference when possible. A sign can be missed while someone searches for a doorway; a mural can stand out without identifying the destination. Together, the cues can help visitors choose a direction and confirm they are on the right path.
A week of route checks
Choose a destination, such as a public meeting room, and start at the entrance visitors actually use. At each point where someone must turn, change floors, or identify a door, note what is visible from the walking path. Take brief notes on a floor plan or phone, and follow the facility’s rules for photography.
- Monday: Mark decision points. Walk from the entrance to the room without staff directions. If you find a fork, floor change, or door that needs identification, mark it on the floor plan; if the route has no choice at a point, note that no directional cue is needed there.
- Tuesday: Check sign sightlines. Approach each marked point as a visitor would. If an open door, display, queue, or other sign blocks the message or arrow, record the obstruction and ask facilities staff to consider a clearer placement; if the sign is readable before the choice, keep its location under review rather than moving it unnecessarily.
- Wednesday: Check landmarks. Look for features visible from the route and likely to stay in place. If a feature is distinctive and fixed, note where it can help someone orient; if it is movable or appears only after a turn, do not rely on it as the cue for that turn.
- Thursday: Match each cue to an action. Compare the direction with the landmark a visitor can actually see, such as “turn left at the tiled wall.” If the reference is visible before the turn and the instruction is accurate, keep the pairing; if not, use a clear sign or revise the wording.
- Friday: Walk the whole route. Follow the sequence from entrance to destination. If each cue leads to the next and the room is clearly identified, record the route as understandable; if there is a gap, mark the location and the missing instruction for follow-up.
- Saturday: Check a busier moment. Walk the route when the building has a scheduled gathering or public activity. If a crowd or queue hides a sign or landmark, note which cue disappears and ask staff to consider an unobstructed alternative; if both remain visible, keep the current pairing and check it again during routine upkeep.
- Sunday: Review changes and access needs. Compare your notes and check whether temporary displays, maintenance, or a changed room use affects the route. If a cue has moved, become unclear, or fails to support the facility’s access plan, refer the issue to the appropriate staff member; if the route remains legible, file the notes for the next review.
Keep the record simple: a floor plan, brief descriptions of confusing wording, and permitted photos of decision points give facilities staff concrete details to act on.
Match cues to tasks
Use signs for information a landmark cannot reliably provide: room names, floor numbers, service categories, restricted areas, and exact directions. A familiar symbol may help visitors who do not share the sign’s language, but pair it with plain words when its meaning could be uncertain.
Use landmarks as orientation points. A distinctive feature can help someone recognize a corridor or recall a spoken direction. But a crowd may hide it, changing light may make it harder to see, and a subtle feature may not work for someone with limited vision. Keep essential route information available through signs and accessible formats rather than requiring visitors to interpret a visual feature or ask for help.
Say a library workshop visitor enters at the information desk, where a large blue wall is visible behind the counter. The visitor follows signs for the community rooms, turns at the blue wall, and checks the room name on a sign beyond the turn. The wall offers a memorable reference, while the signs identify the route and confirm the destination. If the wall were covered for maintenance, the signs would still need to make the route understandable.
Check cues from more than one approach. A sign above a doorway may be clear from one corridor but hidden from the other. A landmark at the end of a hall may confirm the location but appear too late to guide a turn. Put each cue where it can do its job before a visitor has to decide.
When does each cue help?
What makes a useful landmark?
Choose a feature that stands apart from its surroundings and is likely to stay put. Fixed artwork, a distinctive window, or a strongly colored wall may work; a chair, portable banner, or seasonal display can move and make directions unreliable.
Can a landmark replace a room sign?
Usually not. A landmark can help someone orient themselves, but it does not reliably name a destination or confirm that a door leads to the intended room.
Where should a directional sign go?
Place it where visitors can read it before choosing a path, not only above the destination after the turn. Check the view from the actual approach, including sightlines affected by doors, furniture, and queues.
How can a route work for different visitors?
Use plain wording, readable contrast, clear arrows, and more than color to communicate direction. Follow the facility’s accessibility guidance and consult a qualified professional when sign placement or access requirements need review.
Keep cues dependable
Assign responsibility for noticing when route cues change. During routine building checks, look for signs hidden by a new display, landmarks covered during maintenance, and room names that no longer match the signs. If a feature moves, revise any directions that depend on it.
Say you are reviewing a community center route with a left turn at a mural and a meeting room beyond it. On Monday, you mark the fork on a floor plan; on Tuesday, you see that an open door hides the arrow; on Wednesday, you confirm the mural is fixed and visible before the turn. On Thursday, you match the instruction “turn left at the mural” to the sign, then on Friday you follow the complete route and confirm the room label. At Saturday’s gathering, a queue covers the arrow, so you record that obstruction; on Sunday, you give the notes to facilities staff to consider an alternate sign position. The resulting decision is to keep the mural reference but address the blocked directional sign rather than treating the landmark as a replacement.
For changes involving approved materials, building rules, or accessibility, follow facility procedures and consult the appropriate qualified professional where needed. When you next walk a public route, pause at each fork and check what a newcomer can see before choosing. That quick view can reveal whether the next instruction is missing, hidden, or simply too late.